

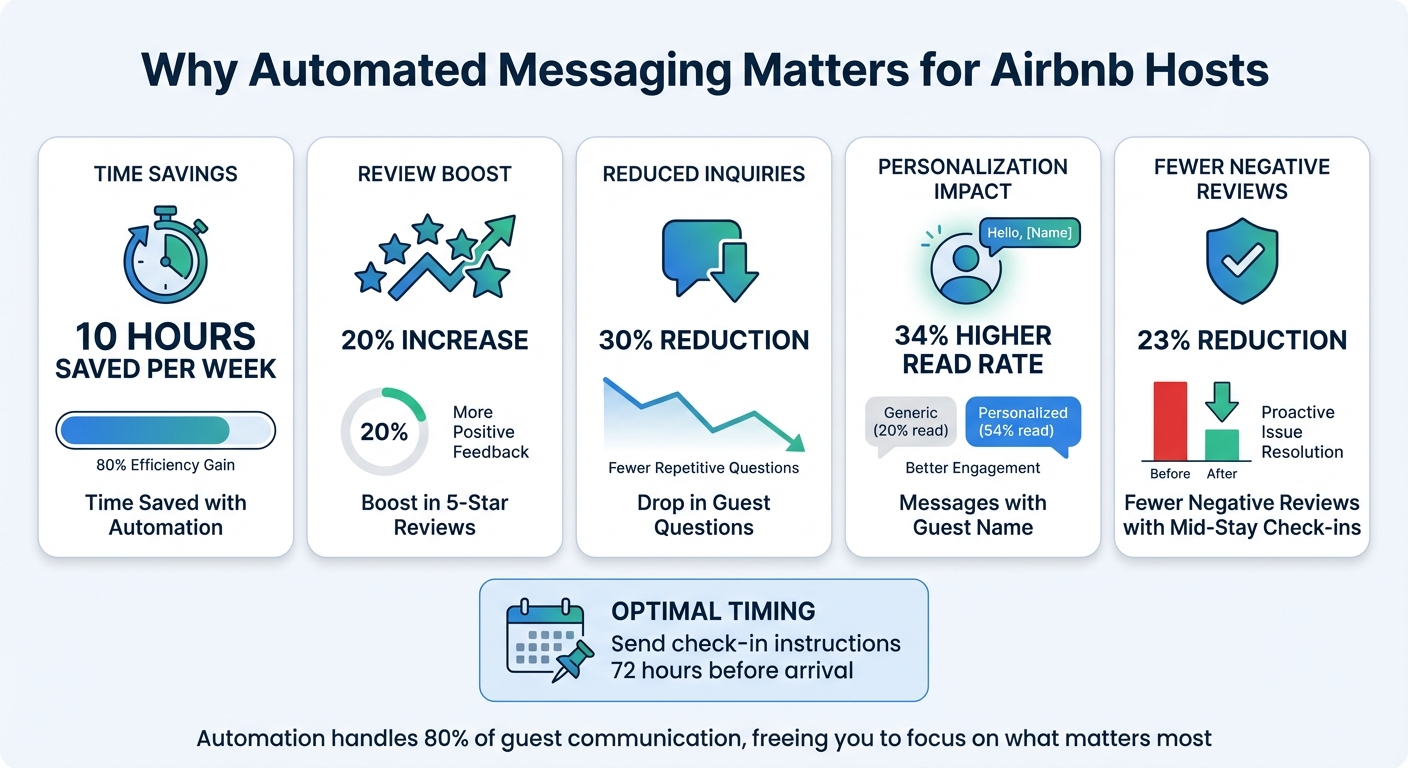
Managing guest communication as an Airbnb host can be time-consuming. Automated messaging simplifies this by delivering key information – like check-in details and Wi-Fi passwords – exactly when guests need it. Here’s why it matters:
- Save time: Hosts using automation save about 10 hours per week.
- Boost reviews: Automation can lead to a 20% increase in 5-star reviews.
- Reduce questions: Guest inquiries drop by 30% with timely messages.
The secret? Personalization and timing. Messages with guest-specific details (like their name or check-in date) are 34% more likely to be read. Sending check-in instructions 72 hours before arrival and mid-stay check-ins can also improve guest satisfaction and cut negative reviews by 23%.
This guide includes 10 message templates to cover every step of your guest’s journey – from booking confirmation to post-checkout review requests. Whether you’re managing one property or many, these templates can streamline your communication and create a better guest experience with expert design services.
Benefits of Automated Messaging for Airbnb Hosts – Key Statistics
1. Booking Confirmation Message
Timing of Delivery
The booking confirmation message is the first interaction in your automated messaging series, and it plays a critical role in building guest trust. This message should be sent immediately after a reservation is confirmed. Guests expect prompt acknowledgment, and delivering the message within 5 to 60 minutes not only reassures them but also minimizes unnecessary follow-up inquiries [1][5]. As the Hostrexa Team emphasizes:
After booking messages should fire with a 0-hour delay. Guests expect immediate confirmation [1].
Purpose of the Message
This message sets the tone for your guest’s experience. It should welcome the guest warmly, confirm their reservation details, and provide key information like the property address and standard check-in time. Keep it short – three to four sentences is enough to make a great first impression, reassure guests their booking is secure, and reduce the chances of last-minute cancellations. Let them know that more detailed check-in instructions will follow.
Customization Potential Using Placeholders
Personalization can elevate the guest experience. Use placeholders like [Guest Name], [Property Name], [Check-in Date], [Check-out Date], and [Standard Check-in Time] to tailor messages to each reservation. Many systems also support advanced dynamic variables for even greater customization.
End your message with a way for guests to contact you directly – such as your mobile number – for urgent needs. If you’d rather leave guest communication to the experts, consider professional vacation rental management through Rank One Stays, which can automate these messages while still keeping them personal. This initial message lays the groundwork for a seamless communication process throughout the guest’s stay.
sbb-itb-103bddb
2. Pre-Arrival Information (7 Days Before Check-In)
Timing of Delivery
A well-timed welcome booklet or email can make all the difference. Sending this 7 days before check-in gives guests plenty of time to prepare. Some hosts, however, prefer sending detailed logistics closer to arrival – around 3 to 5 days (or 72 hours) – to ensure the information feels fresh. Why does this timing matter? Because 63% of guest messages typically arrive within the 48 hours leading up to check-in. Sharing details early can dramatically cut down on those last-minute questions[1].
Here’s a helpful tip from the Hostrexa team:
Pre-arrival messages should be set to 72 hours before check-in, not 24. Guests need time to review parking and access instructions before they’re already on the road[1].
Purpose of the Message
The pre-arrival message serves multiple purposes, but its main goal is to reassure guests and make their arrival as smooth as possible. By confirming that everything is ready, sharing the full property address, and providing parking instructions, you can help reduce guest stress. Including parking details alone can cut "where do I park?" questions by 40%[1]. This is also a great opportunity to offer optional extras – things like airport transfers, early check-in for a fee, or even welcome baskets[5].
To keep things clear, use bullet points for house rules and parking instructions. This format makes it easy for guests to find and understand the information they need[1][5].
Customization Potential Using Placeholders
Adding a personal touch goes a long way. Messages that include the guest’s name and property-specific details see 34% higher read rates on Airbnb[1]. Using dynamic placeholders like [GUEST_FIRST_NAME], [CHECKIN_DATE], [PROPERTY_ADDRESS], [PARKING_INSTRUCTIONS], [NUMBER_OF_GUESTS], and [CONFIRMATION_CODE] makes this personalization easy[1][5].
For hosts juggling multiple properties – whether it’s a cozy spot in Denver, a chic unit in Pittsburgh, or anywhere else – placeholders like [PROPERTY_NAME] ensure guests receive accurate details for their booking[1]. Don’t forget to include a direct contact option, like “Text me at [HOST_PHONE],” so guests know how to reach you for urgent questions[1].
5 Automated Airbnb Messages – Every Host Needs!
3. Check-In Instructions (72 Hours Before Arrival)
Clear and timely check-in instructions are key to ensuring a seamless arrival experience for your guests.
Timing of Delivery
The ideal time to send check-in instructions is 72 hours before your guest’s arrival. While Airbnb automatically provides basic check-in details 48 hours prior, sending your own detailed instructions a full day earlier gives guests enough time to prepare. This extra window allows them to review the information, save it for offline use, and plan their arrival without feeling rushed.
Purpose of the Message
This message aims to take the stress out of arrival day. By offering clear, thorough instructions ahead of time, you can minimize confusion about parking, property access, and other logistics. For example, hosts who include precise parking information see a noticeable drop in last-minute questions on check-in day [1].
Make sure your message covers the essentials:
- The full property address (ideally with a Google Maps link)
- Check-in time
- Door codes or lockbox locations
- WiFi credentials
- A quick overview of house rules (like noise guidelines or trash disposal procedures)
- A direct way to reach you, such as: "Feel free to text me at [HOST_PHONE]."
Customization Potential Using Placeholders
Personalization can make your communication more engaging and efficient. Use placeholders like [GUEST_FIRST_NAME], [CHECKIN_TIME], [PROPERTY_ADDRESS], [DOOR_CODE], [WIFI_PASSWORD], and [CONFIRMATION_CODE] to tailor the message to each guest. This is especially useful for hosts managing multiple properties, whether in Scottsdale, Lighthouse Point, or other locations.
Since many guests will likely skim this message on their phones while handling luggage, highlight key details in bold for easy readability.
Up next: how arrival day welcome messages can elevate the guest experience.
4. Arrival Day Welcome Message
Timing of Delivery
Send your welcome message on the morning of check-in. For added convenience, consider a follow-up 60–90 minutes before the check-in time to keep key details fresh in guests’ minds. This approach ensures a smooth and stress-free arrival process.
Purpose of the Message
This message is your chance to set a welcoming tone while covering essential arrival details. It helps guests feel reassured and prepared by confirming critical information like door codes, WiFi credentials, and parking instructions. Keep it short – no more than 150 words – so guests can easily skim it. As Hostrexa explains:
Guests arriving after a long drive will skim this on their phone. If it’s a wall of text, they’ll message you instead. [1]
Customization Potential Using Placeholders
Make the message feel personal by using placeholders such as [GUEST_FIRST_NAME], [DOOR_CODE], [WIFI_PASSWORD], and [HOST_PHONE]. These automatically insert the correct details for each booking, saving time while keeping the communication tailored. For hosts managing properties in cities like Denver, Pittsburgh, or beyond, this method is especially helpful. To add a thoughtful touch, include a local recommendation – like a favorite nearby coffee shop or restaurant. A personalized, concise message builds trust and helps guests feel at ease throughout their stay.
5. Mid-Stay Check-In Message (24 Hours After Arrival)
Timing of Delivery
For stays lasting three nights or more, send this message 24 hours after the guest’s arrival. If the stay is shorter, sending it on the first evening works better to catch any potential issues early. This timing ensures guests have settled in and provides an opportunity to address any concerns before they escalate.
Purpose of the Message
This mid-stay check-in is all about proactive communication. It gives you a chance to resolve small hiccups – like a tricky thermostat or missing kitchen items – before they become bigger problems. According to data, hosts who send a mid-stay message experience 23% fewer negative reviews compared to those who only reach out at arrival and checkout [1].
But it’s not just about fixing problems. This message helps you go beyond being a property provider and positions you as someone invested in their overall experience. It creates a comfortable way for guests to share feedback and strengthens their impression of your attentiveness. Including a local tip or suggestion can also add a thoughtful touch to their stay.
Customization Potential Using Placeholders
Personalization is key to making this message feel genuine. Using placeholders like [GUEST_FIRST_NAME] and [PROPERTY_NAME] can make the communication feel tailored and engaging. For hosts managing multiple properties – whether in Scottsdale, Pittsburgh, or other areas – these details ensure clarity and consistency. Adding a specific local recommendation can make the message stand out, and don’t forget to remind guests of the best way to contact you for immediate assistance. It’s a small effort that can leave a lasting impression.
6. Checkout Instructions (24 Hours Before Departure)
Timing of Delivery
Send the checkout message 24 hours before the scheduled departure. For early morning checkouts, it’s better to send it the evening prior. This approach ensures the details are fresh in your guest’s mind while giving them enough time to plan their final morning without feeling rushed. While Airbnb’s built-in tool automatically sends a reminder at 5:00 PM local time the day before checkout, using a third-party system allows for more precise timing [8].
Purpose of the Message
The checkout message plays a key role in ensuring a smooth guest departure and a hassle-free turnover. It reminds guests to vacate on time and complete simple tasks like taking out the trash or setting used towels aside for cleaning. It also helps protect the property by reminding guests to secure doors, windows, and return keys to their proper location. A well-structured message minimizes late checkouts, reduces disputes, and avoids last-minute interruptions.
This is also your final opportunity to leave a good impression through Airbnb interior design before guests submit their reviews. A smooth and stress-free checkout process increases the chances of earning a 5-star rating. Keep the tone friendly and approachable. For example, saying “Please remember to lock the front door” feels much more inviting than “You must lock the front door.” Framing instructions as helpful reminders rather than strict rules makes guests more receptive and leaves them with a positive final impression. This approach also sets the stage for follow-up review requests.
Customization Potential Using Placeholders
Placeholders like [GUEST_FIRST_NAME], [CHECKOUT_TIME], [PROPERTY_NAME], and [DOOR_CODE] can help personalize the message without requiring manual edits. For hosts managing multiple properties in different locations – such as Denver or Lighthouse Point – these placeholders ensure each message feels tailored to the guest. Be sure to include your contact information for urgent questions and encourage guests to report any accidental damage or maintenance issues they noticed during their stay [7].
7. Review Request Message (48 Hours After Departure)
Timing of Delivery
To keep communication effective and well-timed, send your review request 48 hours after checkout. This window allows guests to settle back into their routine while the memory of their stay is still fresh. It also avoids the risk of overwhelming them by combining it with checkout instructions, which can feel like too much at once. Don’t forget, Airbnb guests only have 14 days to leave a review, so timing is key[6].
Purpose of the Message
The primary goal of this message? Securing that all-important 5-star review. As Nowistay puts it:
The golden rule: one message = one objective[2].
By focusing solely on the review request, you increase the chances of receiving positive feedback. A great strategy is to mention that you’ve already left a 5-star review for the guest, encouraging reciprocity. Make it easy by including a direct link to the review page – this way, guests can leave their feedback in just a couple of minutes. Also, offer a private channel for any concerns, ensuring guests feel heard and valued.
Customization Potential Using Placeholders
Personalization can make all the difference. Use placeholders like [GUEST_FIRST_NAME], [PROPERTY_NAME], [CHECK_IN_DATE], and [REVIEW_LINK] to tailor your message. Personalized messages, especially those that include the guest’s name and property details, have been shown to achieve 34% higher read rates on Airbnb[1]. For hosts managing multiple properties – whether in Pittsburgh or Scottsdale – this ensures accuracy and helps frequent travelers quickly recognize which stay the message refers to.
Next, we’ll dive into how to remind guests about house rules during their stay.
8. House Rules Reminder During Stay
Timing of Delivery
Send this reminder on day 2 or 3 of the stay, ideally before any issues arise. For longer bookings (more than three nights), aim to send it around the halfway point. This approach helps address potential problems early, like noise complaints or misunderstandings about trash collection schedules. According to Hostrexa, hosts who send a mid-stay check-in message experience 23% fewer negative reviews compared to those who only reach out at arrival and checkout[1].
Purpose of the Message
The goal here is to gently reinforce key rules while maintaining a friendly tone. Instead of listing every single guideline, focus on one or two important ones – like quiet hours or parking restrictions. Framing rules positively can make a big difference. For instance, saying, "Feel free to smoke on the balcony" is much more inviting than "No smoking inside." A thoughtful and welcoming tone makes these reminders easier to digest and more effective. Tailoring the message to your specific property and guest can further improve clarity.
Customization Potential Using Placeholders
Personalization is key for effective communication. Use placeholders like [GUEST_FIRST_NAME], [PROPERTY_NAME], [QUIET_HOURS_START], and [TRASH_DAY] to make the message relevant to each guest. Including details like the guest’s first name and property-specific rules has been shown to boost read rates on Airbnb by 34%[1].
If you manage properties in different locations, placeholders can help address unique concerns. For example, a Denver rental might require guidance about bear-proof trash cans, while a Lighthouse Point property could have specific dock usage rules. Always end with a personal touch, such as: "Feel free to text me at [HOST_PHONE] if you have any questions." This lets guests know you’re available and supportive.
9. Stay Extension Offer Message
Timing of Delivery
The perfect time to send a stay extension message is the day before checkout. At this point, guests likely haven’t finalized their departure plans, but they’ve had enough time to consider whether they’d like to stay longer. Another option is to bring up extension offers during a mid-stay check-in (around day 2 or 3), especially if the guest seems to be having a great time. Just make sure to confirm the calendar availability for the following nights before sending the message – nothing frustrates guests more than being offered something that isn’t actually available.
Purpose of the Message
The aim here is simple: to generate extra revenue from guests who are already enjoying their stay. Extending an existing reservation is far easier – and more profitable – than booking a new guest. Why? You save on cleaning fees, reduce gaps in your calendar, and avoid the hassle of turnover. Offering a discount for the additional nights can create a sense of urgency and make the decision to stay longer an easy one. As Nowistay puts it:
Your stay ends tomorrow. Would you like to extend it? Enjoy [number] extra nights at a [discount]% discount
Customization Potential Using Placeholders
Personalizing your message can make a huge difference. Use placeholders like [GUEST_FIRST_NAME], [CURRENT_CHECKOUT_DATE], [EXTENSION_NIGHTS], [DISCOUNT_PERCENTAGE], and [UPDATED_PRICE] to tailor the offer. For example, a Pittsburgh vacation rental might mention an upcoming Steelers game, while a Scottsdale property could highlight nearby desert hiking trails.
Always include clear instructions for accepting the offer, such as “Reply to this message to extend your stay,” and provide direct contact details for any questions. If the guest accepts, remember to notify your cleaning team about the updated departure date to avoid any scheduling issues.
Next, we’ll look at how to promote additional services through targeted automated messages.
10. Additional Services Promotion Message
Timing of Delivery
The best time to send messages about additional services is 5 to 7 days before arrival. At this point, guests are usually finalizing their travel plans and are more open to offers that make their trip easier or more enjoyable [5]. Another effective moment is about 24 hours after arrival, once guests have settled in and might be ready to consider extras like mid-stay cleaning or local activities [9][2]. These well-timed messages can help you introduce services that genuinely improve their stay.
Purpose of the Message
The goal of these messages is twofold: to enhance the guest’s experience and to create extra revenue opportunities. Instead of pushing a hard sell, focus on presenting these services as thoughtful, concierge-level options [5]. Examples include airport transfers, grocery delivery, mid-stay cleaning, or booking local tours. According to Hospitable‘s 2024 messaging benchmark report, messages personalized with the guest’s first name and a property-specific detail see 34% higher read rates on Airbnb compared to generic ones [1]. Keep it simple by highlighting just 3 or 4 relevant, high-value services to avoid overwhelming your guests [5].
Customization Potential Using Placeholders
Personalizing these messages with dynamic placeholders can make them even more effective. Include details like [GUEST_FIRST_NAME], [CHECK_IN_DATE], [CITY], or [PROPERTY_NAME] to tailor the message to the guest’s needs. For instance, families might appreciate grocery delivery, while business travelers could value airport transfers [2].
Here’s an example: A Denver vacation rental management property could promote ski rentals or mountain tours, while a Lighthouse Point property might highlight boat charters or beach gear delivery.
As GuestGuru explains:
"Addressing guests by their name can make a world of difference. For example, ‘Hey [Guest Name], welcome to our space!’ feels way more personal than a generic ‘Dear guest’" [4].
To ensure clarity, always include pricing details and simple booking instructions, such as replying to the message or clicking a direct link. This makes it easy for guests to take action.
How to Use Automated Messages Effectively
To set up automated messages on your Host Dashboard, navigate to Inbox → Settings → Quick Replies. Create a message template, include dynamic placeholders like the guest’s name or check-in date, choose the relevant listings, and schedule the send time. Be sure to activate the "Send for last minute bookings and short stays" option to ensure guests booking within 24 hours receive their check-in details promptly. This approach guarantees timely and personalized communication for every guest.
For optimal timing, send pre-arrival messages 72 hours before check-in and checkout instructions the night before departure. After a guest checks out, wait 2–4 hours before sending a review request. By using templated sequences, a manager overseeing 20 properties could save 8 to 12 hours per week compared to manual messaging [1].
It’s important to match your tone to your property’s vibe – whether formal or casual – and always include a backup option, like: "Text me at [number] if you need anything."
While Airbnb’s native tools are helpful, they have limitations. They only support three triggers and don’t handle messages within the 48-hour pre-check-in window or across multiple platforms. Automation can handle up to 80% of messages, but the remaining 20% – like noise complaints, cleanliness issues, or refund requests – needs your personal attention. Hostrexa sums it up well:
Your goal isn’t to automate everything. It’s to protect that 20% of your time for the situations where your judgment actually changes the outcome [1].
For hosts managing multiple properties or preferring a hands-off approach, full-service management options, such as Rank One Stays, can simplify communication and increase earnings. Property owners working with Rank One Stays reportedly earn 38% more revenue than the market average, with 24/7 guest support included in management fees starting at just 10%.
Conclusion
Automated messages can make a big difference in how you manage guest communication, from the moment they book through checkout. By sending timely messages – like booking confirmations, check-in instructions, and mid-stay updates – you can cut down guest inquiries by 30%, save 10 hours a week, and even increase 5-star reviews by 20%[3].
Consistency is the secret to success. Adding a personal touch, such as using the guest’s first name, can increase message read rates by 34%[1]. Mid-stay check-ins are especially powerful, reducing negative reviews by 23% compared to hosts who skip this step[1]. These practices not only enhance guest trust but also ensure crucial details – like access codes, parking instructions, and house rules – are communicated clearly.
To make the most of these strategies, try implementing the 10 message templates in your Airbnb settings and revisiting them every few months to keep information accurate and up to date.
For those looking to take efficiency a step further, professional property management might be worth considering. Hosts partnering with Rank One Stays see 38% higher revenue than the market average, thanks to 24/7 guest support and management fees as low as 10%. Whether you choose to automate on your own or work with a full-service team, the ultimate goal remains the same: saving time while delivering an outstanding experience for your guests.
FAQs
Which messages should I automate first?
Start by setting up automated messages for frequent guest interactions like check-in instructions, pre-arrival details, and post-stay thank-you notes. These messages make sure guests get timely updates, such as access codes, booking confirmations, and helpful local recommendations. After check-out, sending a thank-you note along with a review request can encourage more positive feedback. Automating these essential communications not only saves time but also ensures a consistent experience that can enhance guest satisfaction.
How do I personalize templates with placeholders?
To make your templates feel more personal, you can use placeholders with automation tools or built-in features. These placeholders allow you to dynamically include guest-specific details in your messages. For instance, platforms like Airbnb provide shortcodes to automatically insert details such as the guest’s name, reservation information, or check-in date. When the message is sent, these placeholders are replaced with the actual details, saving you time while creating a more tailored experience for your guests.
When should automated messages be sent?
For a seamless guest experience, it’s important to send automated messages at the right moments during their journey. Here’s a breakdown of when and what to communicate:
- After booking: Send a confirmation message that includes all the essential details of their stay.
- Before check-in: Share practical information like directions, access codes, and helpful tips to prepare them for arrival.
- On check-in day: Provide any last-minute instructions to ensure a smooth check-in process.
- Before checkout: Remind guests about the checkout time and any necessary steps they should follow.
- After checkout: Send a thank-you message and kindly ask for a review to gather feedback.
These timely messages help keep guests informed and enhance their overall experience.