
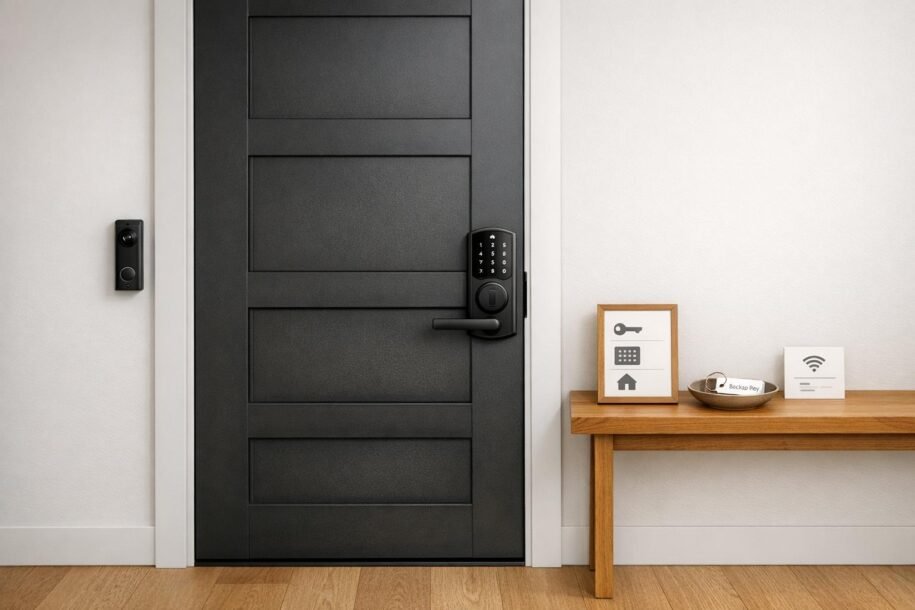
Self check-in is a must-have for vacation rental hosts. It simplifies guest access, saves time, and can even boost your reviews. Here’s how it works: install a smart lock, keypad, or lockbox, and send guests a unique access code before their arrival. This code activates at check-in and expires at checkout, ensuring secure and hassle-free entry.
Why It Matters:
- Saves Time: Hosts can save over 2 hours weekly by automating check-ins.
- Improves Reviews: Listings offering self check-in see up to a 25% higher chance of 5-star reviews.
- Boosts Security: Smart locks generate unique codes, eliminating risks tied to shared keys or reused codes.
Key Steps:
- Choose Hardware: Options range from budget-friendly key safes ($25–$100) to advanced smart locks ($190–$380).
- Install & Test: Ensure proper setup and functionality, including backup access plans.
- Automate Access: Sync smart locks with booking platforms or property management systems for automatic code generation.
- Write Clear Instructions: Provide guests with step-by-step entry details, photos, and backup plans.
Maintenance Tips:
- Replace smart lock batteries every 6–12 months.
- Regularly reset lockbox codes.
- Monitor entry logs to ensure proper use.
For hosts managing multiple properties, professional management services can simplify tasks like code coordination, troubleshooting, and guest communication. Whether you’re managing one rental or scaling up, a self check-in system keeps operations smooth and guests happy.
Set Up the Perfect Check-In Experience | Free Airbnb Course
sbb-itb-103bddb
Planning Your Self Check-In System
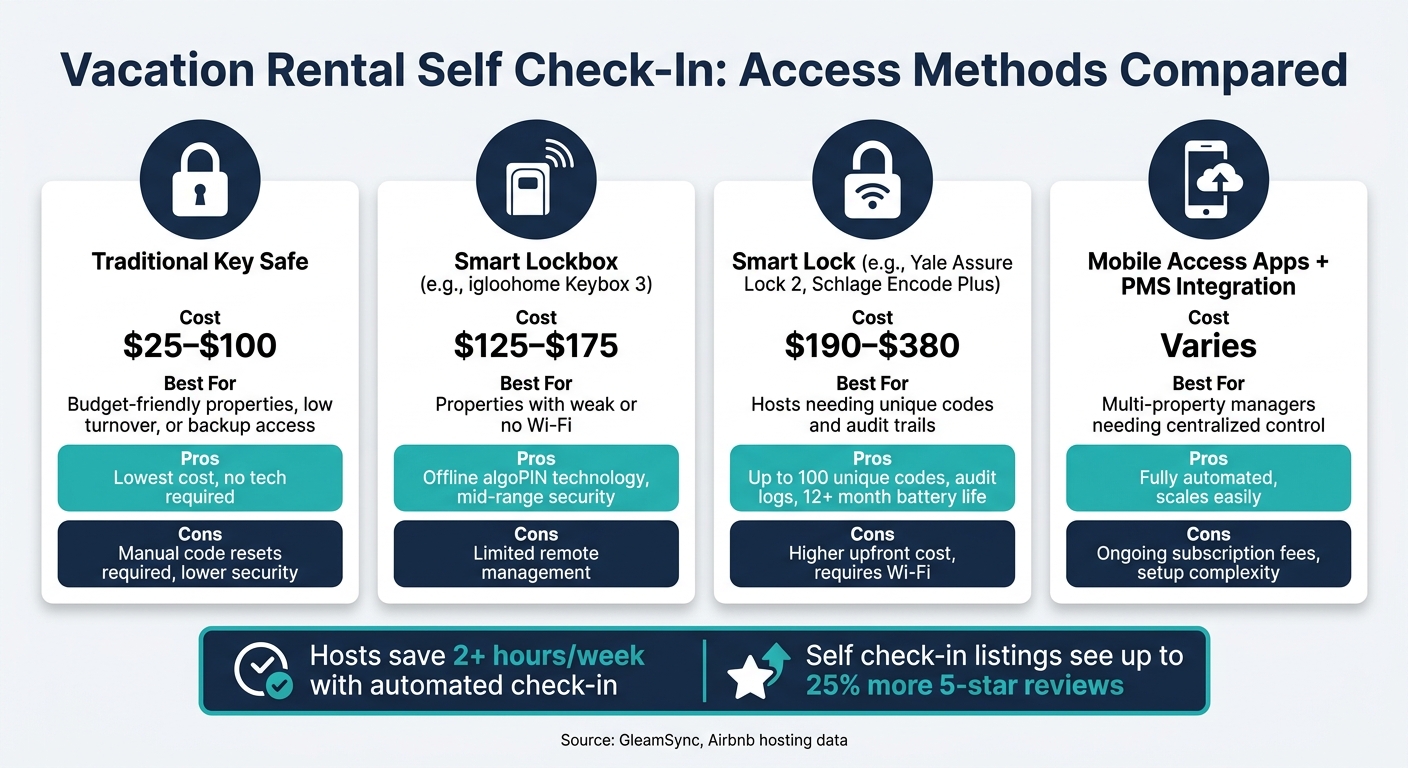
Vacation Rental Self Check-In: Access Methods Compared
Assessing Your Property and Guest Needs
Start by identifying all access points for your property – this includes the front door, parking areas, pool gates, or storage rooms. If you’re managing a single property, a standalone smart lock or a reliable key safe is often enough. For those managing across multiple locations, consider using a centralized property management system (PMS). These systems automate code generation and cut down on manual coordination, which can eat into your margins by as much as 15% [4].
Make sure your Wi-Fi is reliable at key entry points. If the router is too far from the door, consider offline-capable devices for a smoother operation.
Once you’ve nailed down your property’s needs, it’s time to explore the best access methods.
Choosing the Right Access Method
Your choice of access method should align with your budget, property type, and how hands-on you want to be with management. Here’s a quick comparison:
| Access Method | Cost (USD) | Best For |
|---|---|---|
| Traditional Key Safe | $25–$100 | Budget-friendly properties, low turnover, or backup access [1] |
| Smart Lockbox (e.g., igloohome Keybox 3) | $125–$175 | Properties with weak Wi-Fi; good mid-range security [1] |
| Smart Lock (e.g., Yale Assure Lock 2, Schlage Encode Plus) | $190–$380 | Hosts needing unique codes and audit trails [1][2] |
| Mobile Access Apps + PMS Integration | Varies | Multi-property managers needing centralized control [2] |
Some standout options include the Schlage Encode Plus, which can store up to 100 unique access codes and features a built-in tamper alarm [1]. The Yale Assure Lock 2 integrates seamlessly with Airbnb and has a battery life exceeding 12 months [1]. If you’re managing apartments or rentals where exterior hardware changes aren’t allowed, the August Wi-Fi Smart Lock is a great option – it only modifies the interior side of the deadbolt, leaving the exterior intact [1][2].
Pro Tip: To minimize lockouts, set the guest’s access code to the last four digits of their phone number [4].
Security and Compliance Considerations
Once you’ve chosen an access method, focus on proper installation and regulatory compliance to keep your system secure.
For key safes, always pick wall-mounted models over shackle-mounted ones, as the latter can be cut with bolt cutters [1]. Place lockboxes or smart locks in discreet locations, like the side or rear of the property, rather than right next to the front door [1].
Integrating your PMS with your smart lock is a game-changer. It automates code generation and expiration, ensuring security without the hassle of manual updates [2][4]. With this setup, codes are created and sent automatically as soon as a booking is confirmed.
One often-overlooked detail: inform your insurance provider before installing any access hardware. Some policies have specific security requirements, and failing to meet them could void your coverage in case of a break-in. For example, hiding a key under a doormat or in a flower pot is not only risky but could also invalidate your insurance [1]. Taking this step early ensures you’re covered if anything goes wrong.
Installing and Configuring Self Check-In Hardware
Preparing Entry Points for Installation
Before ordering your hardware, it’s crucial to measure your door’s thickness and backset distance. Most U.S. doors are between 1⅜ and 1¾ inches thick, but older homes might not fit this standard. Getting these measurements wrong could lead to inconvenient and costly returns.
Next, check if your door and frame are properly aligned. A door that sticks or drags can overwork a smart lock’s motor, draining its battery faster than expected. Fix alignment issues before moving forward with installation.
Installing Smart Locks or Lockboxes
Installing a smart lock is relatively simple and usually takes about 15–30 minutes with just a Phillips screwdriver [5]. The steps are straightforward: remove the old interior hardware, attach the new mounting plate, connect the wiring or battery pack, and snap the lock body into place. Most manufacturers provide step-by-step guidance through their app.
For wall-mounted key safes, placement is key. Install the box in a discreet spot, such as the side or back of your property, away from street view. Once mounted, test the latch mechanism multiple times to ensure it operates smoothly. Also, manually test the lock to confirm the deadbolt slides without resistance or strain [5]. With the hardware in place, you’re ready to move on to automating guest access.
Setting Up Automation and Backup Access
After installation, connect the smart lock to your Wi-Fi using its companion app. From there, you can sync it with your Airbnb hosting account or a Property Management System (PMS) like Hostify or Guesty. This integration allows the system to manage rentals across multiple locations using automated check-ins. Once a booking is confirmed, the PMS generates a unique access code and sends it to the guest automatically – no manual steps required [2].
Ensure the access code activates at check-in and expires at checkout. Run a test booking to verify the system generates and delivers the code as expected [2].
"Smart locks for vacation rentals cost between $150 and $350 as a one-time hardware purchase with no monthly fees, making them one of the highest-ROI investments a host can make." – GleamSync [5]
For properties in areas with unreliable Wi-Fi, the igloohome Keybox 3 is a dependable solution. It uses offline "algoPIN" technology to create time-sensitive codes without needing an internet connection [1][5].
Finally, always have a backup access plan. A secondary lockbox with a physical key – stored discreetly and reset after each guest – is a simple and effective option. Alternatively, you could rely on a trusted neighbor or local co-host who can respond within 30 minutes if needed [1]. Since smart locks typically require battery changes every 6–12 months, make sure to include battery checks in your cleaning turnover routine to avoid mid-stay lockouts [5].
Writing Guest Instructions and Setting Up Digital Check-In
Writing Clear Entry Instructions
Make it simple for guests to access your property by providing clear and detailed entry instructions. This minimizes confusion and prevents unnecessary access issues.
Start with the essentials: include the full address, gate codes, step-by-step entry instructions, and the exact location of the lock or keybox. If the lockbox is out of sight – like behind a bush or around a corner – attach a photo to show its exact spot. Be sure to mention when the access code activates (usually at check-in time) and when it expires (checkout time). This way, guests know exactly when they can enter and leave.
Beyond entry details, share other critical information such as the Wi-Fi password, emergency contacts, and backup entry instructions in case the primary method fails. Sending this information 24–48 hours before the guest’s arrival gives them time to review everything and reduces last-minute questions [3].
Setting Up Digital Check-In Workflows
Once your entry instructions are ready, focus on creating a seamless digital check-in process. A well-designed digital check-in system does more than just send an access code – it guides guests from the moment they book through to their arrival. Using property management systems (PMS) like Guesty, Hostify, or Lodgify, you can automate communication at key points: booking confirmation, 48 hours before arrival, check-in day, and even one hour after check-in [6].
That last follow-up message, sent an hour after check-in, is a great way to address any issues early on and show guests that you’re attentive.
"Automation doesn’t replace hospitality – it elevates it." – SnapStay Blog [3]
You can also enhance the process with a pre-arrival digital form. This form can collect ID verification, emergency contact details, and signed rental agreements [6]. To make things even easier for your guests, consider creating a digital guidebook for your vacation rental using tools like Hostfully or Touch Stay. These guidebooks can combine entry instructions, local recommendations, and house rules into one convenient, shareable link.
Updating Your Platform Listings and Settings
All your efforts with instructions and digital workflows will only pay off if your listings are up to date. On Airbnb, go to the Arrival guide section of your listing and select the correct check-in method, such as "Smart lock", "Keypad", or "Lockbox." This ensures your property appears in Airbnb’s self check-in filter [1], making it easier for guests to find listings with keyless entry.
For VRBO, update your check-in instructions in the property details section and include keyless entry in your house rules. If you manage multiple properties through a PMS, sync these updates across all platforms to avoid inconsistencies. Clear and accurate self check-in details reduce guest confusion and cut down on unnecessary inquiries, helping your system run smoothly.
Maintaining and Managing Your Self Check-In System
Routine Maintenance and Battery Checks
Keeping your self check-in system in top shape ensures smooth operations for both you and your guests. Smart lock batteries typically last anywhere from 6 to 12 months [1]. To avoid surprises, include battery checks in your regular cleaning turnover routine, and always have a spare set ready. For traditional lockboxes, make it a habit to reset the codes after each guest departs [1]. Additionally, review entry logs frequently to confirm only authorized access and to quickly address any discrepancies [1].
Troubleshooting and Emergency Access
Even with regular upkeep, occasional issues like dead batteries, Wi-Fi outages, or keypad malfunctions can arise [1][5]. Thankfully, most Wi-Fi-enabled smart locks store access codes locally, allowing the keypad to function even without an internet connection [5].
"Always choose a lock with a physical key backup. Power outages and dead batteries are rare but real, and a locked-out guest at midnight is the kind of emergency you want to prevent, not solve." – GleamSync [5]
When troubleshooting, ensure your backup access plan is ready to go. For properties with spotty Wi-Fi, devices like the igloohome Keybox 3 offer a smart alternative. These use algoPIN, an offline algorithm that generates valid access codes without needing an internet connection [1][5]. Additionally, having a trusted local contact – a neighbor, co-host, or property manager – who can reach the property within 30 minutes is a practical and effective safety net [1].
How Professional Management Can Help
Managing multiple properties comes with its own set of challenges, especially when it comes to maintenance and troubleshooting. The more properties you have, the more complex the logistics become:
- Generating unique access codes, sharing instructions, and resolving potential issues for every booking [1].
- Updating manual lock codes and managing physical keys, which becomes inefficient at scale [1].
- Monitoring entry logs, coordinating access for cleaners and maintenance teams, and addressing emergencies at odd hours.
Professional vacation rental management services simplify these tasks. By using centralized platforms that sync with your Property Management System, they can:
- Automatically create unique, time-sensitive codes for each booking [1].
- Assign specific codes with defined access periods for guests, cleaners, and maintenance staff [1].
- Keep a detailed record of every property entry [1].
Rank One Stays offers complete management solutions for property owners in cities like Scottsdale, Denver, Pittsburgh, and Lighthouse Point. Their services cover everything from setting up smart lock systems and automating guest communications to monitoring access logs and handling emergencies 24/7. If you’d rather focus on boosting your revenue while leaving the day-to-day operations to the experts, their team has you covered.
Conclusion: Set Up Self Check-In and Host with Confidence
Key Takeaways
Creating an effective self check-in system boils down to three main components: the right hardware, clear communication, and regular maintenance. Depending on your needs and budget, you can opt for a basic key safe ($25–$100), a smart lockbox ($125–$175), or a full smart lock ($190–$380). Smart locks, in particular, can save hosts over two hours per week by eliminating manual key handovers. Plus, a smooth check-in process could increase your 5-star review rate by up to 25%[3].
Providing guests with timely, precise instructions reduces their stress and cuts down on support inquiries[3]. Sending a short follow-up message about an hour after check-in adds a personal touch, even if you’re not on-site. To prepare for unexpected situations, have a dependable backup plan in place – such as a secondary lockbox or a spare key left with a trusted contact.
"Automating vacation rental check-in frees you up to create more meaningful guest experiences and be more productive with the time you have." – Alice Dodd, Minut[7]
Maintaining your system is just as important as setting it up. For high-traffic rentals, replace smart lock batteries every 3–6 months, test backup keys monthly, and keep firmware updated[3]. These small, proactive steps can prevent issues that might lead to negative reviews. And as your rental business grows, having streamlined processes will be essential for managing multiple properties efficiently.
Next Steps for Property Owners
Now that you’re equipped with these strategies, it’s time to put them into action. For owners managing just one or two properties, this guide covers the basics. However, as your portfolio expands, tasks like managing codes and handling emergencies can quickly become overwhelming. That’s when professional support becomes indispensable.
Rank One Stays offers comprehensive vacation rental management services, handling everything from smart lock setup and automated guest communication to 24/7 support and access management. Property owners partnering with Rank One Stays see 38% higher revenue than the market average, with management fees starting at just 10%. Whether your rental is in Scottsdale, Denver, Pittsburgh, or Lighthouse Point, their local teams are ready to help you grow your business while minimizing operational stress.
FAQs
Which self check-in option fits my property best?
The best self-check-in option comes down to your budget, security requirements, and how much automation you want. Smart locks offer a higher level of security, make things easier for guests, and integrate well with automated systems. On the other hand, lockboxes are a more affordable option and work well for properties where WiFi or power might be unreliable. Many hosts combine the two – using a smart lock as the main access point and a lockbox as a backup to ensure smooth check-ins.
How do I prevent guest lockouts if Wi-Fi or batteries fail?
To prevent guest lockouts, it’s a good idea to have a backup access option. A traditional key safe or a tamper-resistant key safe with a manual combination lock works well since they don’t depend on Wi-Fi or electricity.
If you’re using smart locks, set up auto-expiring codes that align with your guests’ booking dates. For added peace of mind, you can also keep a secondary lockbox or leave a spare key with a trusted neighbor to ensure accessibility and security.
What should I message guests, and when, for self check-in?
2–3 Days Before Arrival
Send a detailed message to your guests, covering all the essentials they’ll need for a smooth check-in. Include:
- Property Address: Provide the complete address and any landmarks to help them locate it easily.
- Parking Details: Mention where they can park and if any permits or fees are required.
- Access Code: Share the code for entry, whether it’s for a keypad, lockbox, or smart lock.
- Wi-Fi Password: Let them know how to connect to the internet.
- Guidebook Link: Share a link to your digital guidebook with tips about the property and local recommendations.
On the Day of Check-In
Send a shorter reminder message with the most critical details:
- Reiterate the access code and how to use it.
- Include the guidebook link again for easy reference.
Pro Tip: If possible, attach step-by-step instructions with photos to make the process even clearer. Automate these messages using your rental platform to ensure they’re sent on time and without hassle.